so i'm on pinterest... and i pin lots of fun ideas and crafts to do with the kids...
well wouldn't you know, i found this fun craft the other day and i decided to make it with the kids.
i have so many good intentions... get the kids to help, have fun and make fun memories with my kids... but does it ever turn out that way?
halfway through i am frustrated and annoyed and there is flour everywhere...
my kids aren't listening and it's all going downhill...
did i mention there was flour everywhere?
i turn around to grab a cloth to start cleaning up and wyatt (sitting on the table COVERED in flour) has just put his hand in the bag of flour on the table and i'm sure there are pieces of dough in there somewhere..
they are both trying to "help" me roll out the dough and screaming at each other because they want to be the one to help mommy do it... and then when we make the little disc to make handprints in, they are both trying to grab and poke it on the cookie sheets...
dont even ask why i didn't take a picture... i was not even in a place to laugh at the situation just yet... let alone document the disaster...
at least i try i guess... my kids will probably have fond memories of this and how cool mom was to let them sit on the table and make a mess with flour and dough..
so now, day is done and the stupid dough handprints are cooling on the counter.
i am exhausted and it's 9pm on saturday night... i've had one glass of wine and already i'm ready for bed.
awesome.

Saturday, November 10, 2012
Sunday, November 4, 2012
old door headboard tutorial
FINALLY!! I am so proud to announce that i am FINALLY done refinishing an old door into a fantastic new headboard!
Seriously, I can't believe how long this headboard took me to make... it wasn't even hard... i was just too busy! In between kids, being sick, taking a trip... it just all added up. plus i ran into cool weather which meant i had to bring the project from the garage to the laundry room to stain... it was a pain in the butt!
but here we go. brand new tutorial for y'all :)
isn't this headboard a beauty?!

Supplies:
So first off i headed to the paint store to pick up some paint stripper and get advice.
i love the people at my local paint store. the owner and another worker were fantastic at helping me vision my project and lead me on the right path to begin.


my old door needed to be stripped of all the caked on paint it had accumulated over the years...
I used the Circa 1850 Heavy Body Paint and Varnish Remover and with an old paintbrush, i painted that stuff on thick and watched the magic happen!
You should probably look super cool like me and wear your dad's old shirt (my painting shirt for the last 20 years) and super awesome eye protection!


so that first layer took off quite a few layers of paint..
 but turns out i didn't paint on the remover thick enough for the next layers... I had to strip this darn door about 4 times to really get ALL the paint off.
do you see those grooves in the panels? there are 3 of them... it took forever to scrape out each layer carefully..
i used a paint scrapper and some type of scrub pad that i got at the paint store... sorry i forget the name... but it was gentler than an sos pad meaning it wouldn't scrape the wood or sand it... it just helped get rid of all the paint in the grooves etc.
 then cut your crown molding...
all i gotta say here is this might cause some fights with your spouse... so please google and youtube how to cut crown molding outside corners!
you cut one side on a 45 degree angle and then for the other corner, you turn the piece around upside down... BUT that wont make sense until you youtube it!! seriously....
practice on some spare pieces of wood first before you go and cut your crown molding!

after all the paint is removed, time to start sanding! beware of all the rough sharp edges before sanding!! i got stabbed by some nasty splinters!
i used a power sander for the larger sections and for those darn grooves i used sand paper wrapped around the paint scraper... worked pretty well. I think i used the 220 grit first and then fine tuned the sanding with the 180 grit..

 all finished sanding
at this point you should measure the width of your bed and see if you need to cut your door down to size. Also, with most doors, after the bottom panel, there is a larger gap at the end... so we cut it to make it even on both sides.
it was also at this point that i realized i wanted to stain the door instead of paint it again. look at the beautiful detail in the wood! and the color was so rich as well, i knew it would turn out so nice if i stained it!

so back to the paint store (took the door along with me so they could help me pick a color)
i went with a nice rich dark brown stain color.

i cut up an old tshirt to use as my rag and poured the stain into an easy to access pie plate.
probably next time i would wear gloves... but this stain is a water based stain, so it was easy (relatively) to wash off the fingers...


see the pic here to the left - nail the crown molding to the door and then also nail through the 1x4 into the top of the crown molding.
fyi - you can buy crown molding that has the right angle to the wall and roof, but that is oodles and oodles more money than buying this type of molding...

so see here how you can see the darn nail??
that was an oops on my part. i should have predrilled the holes like below since i didn't have a nail gun to really drive those nails in deeper..

so here i predrilled the nail holes in the side pieces..
fyi - if you don't predrill you might have issues with cracking in the molding...

i also recommend using some wood glue on the crown molding to make a better hold with the nails..

and here i had to clamp my side molding because i split the wood in my first try nailing it in...
used a little wood glue and then predrilled a different hole and voila!

so because i had some nails sticking out, and since it totally stuck out against the wood color... i was able to nail them just below the surface of the wood using a nail driver..
i actually didn't have one, but i found something in our tool shelf that was similar..
i filled the hole with some Nail Hole Filler and let it dry. I sanded it off and then stained the filler to match the wood.
make sure to get a nail hole filler that is paintable!

this is what it looked like with stain over the filler...
this picture had flash and actually made it look like it wasn't stained at all, but after a second coat, it really looked blended in!

then before applying the varnish, i had to lightly sand the whole surface to give the varnish something to stick to.
i used a special light sandpaper that was black... it says it's called silicone waterproof paper? but i would just ask someone at the paint store! they know what they are talking about!
after lightly sanding it, use a tack cloth to completely remove all sanding residue from the headboard.

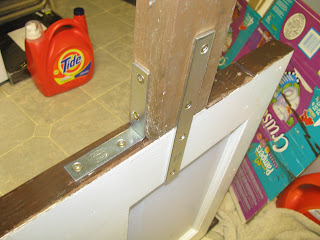 next it's time to attach the legs!
i wanted it to be simple and easy, so i just attached them to the bottom of the door - i didn't want the headboard to stick out from the wall, so that's why i didn't attach it to the back of the door.
you can google many different options on how to attach the headboard to the wall, or to the bed frame or whatever... do what you want!


Seriously, I can't believe how long this headboard took me to make... it wasn't even hard... i was just too busy! In between kids, being sick, taking a trip... it just all added up. plus i ran into cool weather which meant i had to bring the project from the garage to the laundry room to stain... it was a pain in the butt!
but here we go. brand new tutorial for y'all :)
isn't this headboard a beauty?!

Supplies:
- An old door - I found mine through kijiji for $25
- Paint Stripper
- Heavy grade rubber gloves (the paint stripper will eat them if they are too thin)
- Paint Scrapper
- Sand Paper - 220 grit and 180 grit
- Stain
- rags for staining - old tshirt was recommended to me by the paint store... something about absorption and making sure your fabric wouldn't come apart in your stain...
- Crown Molding - make sure the piece is at least a couple feet longer than the length of your door (i made this mistake and had to run back to the hardware store to buy more for the side pieces)
- 1x4 - cut longer than your door - with enough to overhang over the crown molding
- Clear semi gloss varnish
- wood long enough for legs, screws, bracket/mending plate, L-bracket
So first off i headed to the paint store to pick up some paint stripper and get advice.
i love the people at my local paint store. the owner and another worker were fantastic at helping me vision my project and lead me on the right path to begin.

first of all, take off the hardware

my old door needed to be stripped of all the caked on paint it had accumulated over the years...
I used the Circa 1850 Heavy Body Paint and Varnish Remover and with an old paintbrush, i painted that stuff on thick and watched the magic happen!
You should probably look super cool like me and wear your dad's old shirt (my painting shirt for the last 20 years) and super awesome eye protection!

LOOK at that paint bubble! It was SO fun stripping that stuff... it just peeled right off no problem!


do you see those grooves in the panels? there are 3 of them... it took forever to scrape out each layer carefully..
i used a paint scrapper and some type of scrub pad that i got at the paint store... sorry i forget the name... but it was gentler than an sos pad meaning it wouldn't scrape the wood or sand it... it just helped get rid of all the paint in the grooves etc.

all i gotta say here is this might cause some fights with your spouse... so please google and youtube how to cut crown molding outside corners!
you cut one side on a 45 degree angle and then for the other corner, you turn the piece around upside down... BUT that wont make sense until you youtube it!! seriously....
practice on some spare pieces of wood first before you go and cut your crown molding!

after all the paint is removed, time to start sanding! beware of all the rough sharp edges before sanding!! i got stabbed by some nasty splinters!
i used a power sander for the larger sections and for those darn grooves i used sand paper wrapped around the paint scraper... worked pretty well. I think i used the 220 grit first and then fine tuned the sanding with the 180 grit..


at this point you should measure the width of your bed and see if you need to cut your door down to size. Also, with most doors, after the bottom panel, there is a larger gap at the end... so we cut it to make it even on both sides.
it was also at this point that i realized i wanted to stain the door instead of paint it again. look at the beautiful detail in the wood! and the color was so rich as well, i knew it would turn out so nice if i stained it!

so back to the paint store (took the door along with me so they could help me pick a color)
i went with a nice rich dark brown stain color.

i cut up an old tshirt to use as my rag and poured the stain into an easy to access pie plate.
probably next time i would wear gloves... but this stain is a water based stain, so it was easy (relatively) to wash off the fingers...

look at that rich color!

here i am applying the stain - apply liberally and really soak it in without letting each area dry

here i am rubbing the stain off!
wipe on... wipe off!
easy peasy right?

finished first layer of stain...
so due to the fact that i had oak crown molding and a walnut door (oops)...
so due to the fact that i had oak crown molding and a walnut door (oops)...
i had to stain my door and crown molding just another coat darker so you couldn't tell the difference in wood colors.. the door wanted to stay a reddy brown and the oak molding wanted to stay more earthy brown...
so making it all a little darker blended the colors really well.
the only advice i would give is try to find out what kind of wood your door is first and then buy the hardware to match... there is also a difference in type of wood grain... so my oak had different swirls than my walnut... so that's why the darker the stain made it easier to hide... but if you are painting your door instead of staining it, it wont matter at all!
after staining, you can go ahead and mount your hardware.
line up the 1x4 along your headboard - making it flush with the back of the door.
(it's best to make sure your door is laying flat on a surface and the 1x4 is
flush with the surface as well)
(it's best to make sure your door is laying flat on a surface and the 1x4 is
flush with the surface as well)
nail the 1x4 to the door, then install your crown molding:


fyi - you can buy crown molding that has the right angle to the wall and roof, but that is oodles and oodles more money than buying this type of molding...

so see here how you can see the darn nail??
that was an oops on my part. i should have predrilled the holes like below since i didn't have a nail gun to really drive those nails in deeper..

so here i predrilled the nail holes in the side pieces..
fyi - if you don't predrill you might have issues with cracking in the molding...

i also recommend using some wood glue on the crown molding to make a better hold with the nails..

used a little wood glue and then predrilled a different hole and voila!

so because i had some nails sticking out, and since it totally stuck out against the wood color... i was able to nail them just below the surface of the wood using a nail driver..
i actually didn't have one, but i found something in our tool shelf that was similar..
i filled the hole with some Nail Hole Filler and let it dry. I sanded it off and then stained the filler to match the wood.
make sure to get a nail hole filler that is paintable!

this is what it looked like with stain over the filler...
this picture had flash and actually made it look like it wasn't stained at all, but after a second coat, it really looked blended in!

then before applying the varnish, i had to lightly sand the whole surface to give the varnish something to stick to.
i used a special light sandpaper that was black... it says it's called silicone waterproof paper? but i would just ask someone at the paint store! they know what they are talking about!
after lightly sanding it, use a tack cloth to completely remove all sanding residue from the headboard.
Apply an even coat with a paintbrush - careful to not let it pool in the corners of the panels,
or let it drip down the sides.
this varnish dried in about an hour or so. It says to apply 2-3 coats. It looked AMAZING after the first coat actually, so just depends on what you like. If you do apply more than 1 coat, you need to
lightly sand in between each coat.
I went with 2 coats. I could have totally stopped at 1, but decided to make sure i got it
evenly applied, so i added one more.
see? you can't even see where those nail holes are anymore!


i wanted it to be simple and easy, so i just attached them to the bottom of the door - i didn't want the headboard to stick out from the wall, so that's why i didn't attach it to the back of the door.
you can google many different options on how to attach the headboard to the wall, or to the bed frame or whatever... do what you want!
using both types of brackets really helped keep the legs stable.
then you just need to stand it up against the wall and push the bed against it!
all done!

here is the headboard with all our pillows above
and the headboard with one set of pillows below. looks great any way you do it!

I would love to see pics of your headboard project, so please share with everyone in the
comments section if you try out this tutorial!
Subscribe to:
Posts (Atom)